
Preface
Welcome to the world of RTL-SDR. This is an exiting place to be, with virtually limitless possibilities for what you can achieve. This post will serve as the stepping stone for the upcoming guides and tutorials, that you’ll see here.
Intro
So what is SDR exactly? It’s defined as “Software Defined Radio“. Think of it as a radio receiver that plugs into your laptop, over which you have full control.
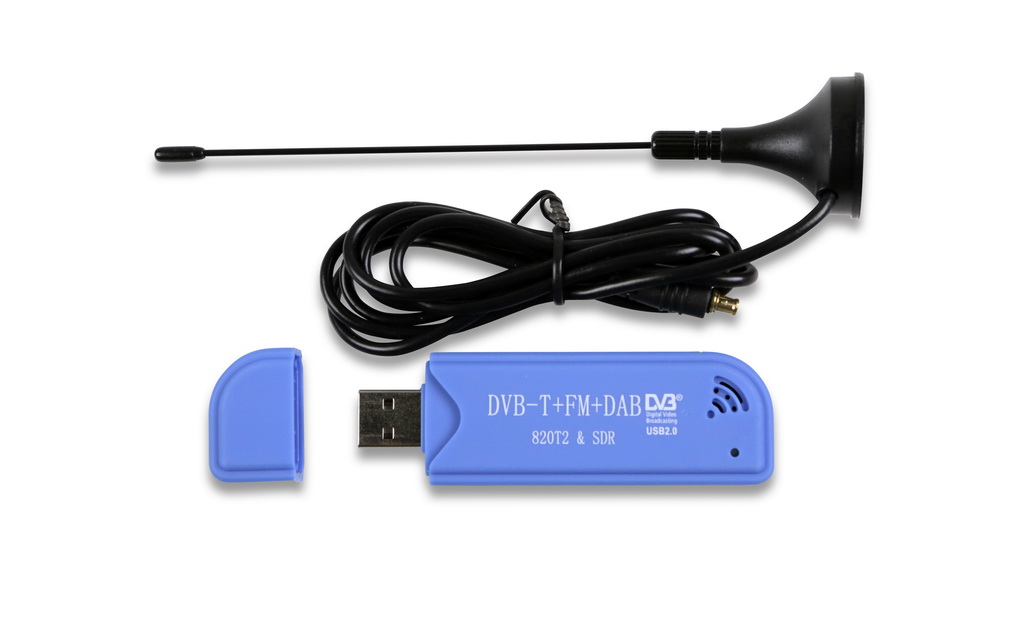
An RTL-SDR, on the other hand, is the USB dongle that plugs into your machine, through which you can access the invisible world of radio signals.
Here’s what one looks like:
And here’s a fancier one, called “HackRF One“, you may have heard of it:

You can get a dongle from Amazon (affiliate link below)
rtl-link
About the dongles
Ok, great, so you have purchased a dongle, what can you do with it?
Well, let’s not get ahead of ourselves, there are several use cases that are coming to this site, very soon.
In general though, you can:
- Listen to radio (wow, really, you don’t say)
- Intercept analog TV signals, and watch TV (very limited, and only available in few countries)
- Intercept radio signals, originating from dispatch towers. These include: taxis, police (sometimes), ambulance and fire services
- Listen to your local airport’s tower, ground, radar controllers
And now for the fun ones:
- You can track overflying aircraft, via ADSB decoding(guide coming soon)
- Track ships and plot their movements on a map in real time, via AIS decoding (guide coming soon)
- Intercept and decode ACARS short messages
- Track and decode launched weather balloons information transmissions
- Receive and attempt to decode GSM signals (near impossible, but have a go at it, in a controlled environment)
How does this magic work?
Essentially, think of the RTL-SDR dongle as an old-school radio on steroids, like a lot of steroids! As with any radio receiver, the frequency range it can actually tune into is limited by several factors. The main one being – the actual controller (tuner). A set of general guidelines, for the frequency range you can expect to see is:
| Tuner | Frequency range |
| Elonics E4000 | 52 – 2200 MHz with a gap from 1100 MHz to 1250 MHz (varies) |
| Rafael Micro R820T/2 | 24 – 1766 MHz (Can be improved to ~13 – 1864 MHz with experimental drivers) |
| Fitipower FC0013 | 22 – 1100 MHz |
| Fitipower FC0012 | 22 – 948.6 MHz |
| FCI FC2580 | 146 – 308 MHz and 438 – 924 MHz (gap in between) |
Radio waves are a type of electromagnetic radiation, that has a set set frequency, and a random direction travel. The wide frequency range of any radio wave, in physics terms, are between 30 Hz and 300 GHz. There’s a direct correlation between how high the frequency of a wave is, and how wide it’s wavelength is. For example, at 30 Hz the wavelength is 10, 000 km.

(source)
Radio waves are transmitted, and received, via an antenna. All radio receivers can receive radio waves, kinda inbuilt in the name. But not all equipment can transmit radio signals! Furthermore, transmitting radio signals can be very illegal and super dangerous, so please consult your local government’s law, before you get a “HackRF” and start blasting waves around.
Enough with the sciency bit, let’s get started
So, I assume you already have a dongle at hand, if you don’t – jump over to Amazon and order one. The next bit will help you set up your computer, so that you can actually start using the thing.
I suggest using a Linux flavour for this stage, coupled with GQRX. The latter is an awesome place to start this journey. Windows tutorial coming soon, although it’s a bigger pain to setup, I’ll make the effort – promise.
Oh noes, I don’t have Linux. Head on over to the Ubuntu download site, grab the ISO, and set it up.
The actual installing things bit
Ready? Great. Start by running the following command:
sudo apt-get update
sudo apt-get install rtl-sdr
I guess you know what the update bit does. The second one installs the rtl-sdr drivers, required for your machine to communicate with the dongle.
If you need to, or want to for whatever reason, build the drivers from scratch, a guide can be found here: https://sdr.osmocom.org/trac/wiki/rtl-sdr
To test if your dongle is live, run this:
rtl_testAwesome, grab GQRX:
sudo apt-get install gqrx-sdrAnd you’re done, happy days. Go ahead an run gqrx and jump to the next part.
Playing about with GQRX
The first time you run the software, a dialog will appear. Here’s an image I grabbed shamelessly from Google:

This is a super simple hardware definition dialog, that enables the communication between software and hardware. If you’re just starting out – leave it alone. Make sure that you can see your device listed in the drop-down menu at the top, and click OK. Advanced users have stopped reading at this point, so let’s glance over them for now.
This is the UI, once it’s all up and running:
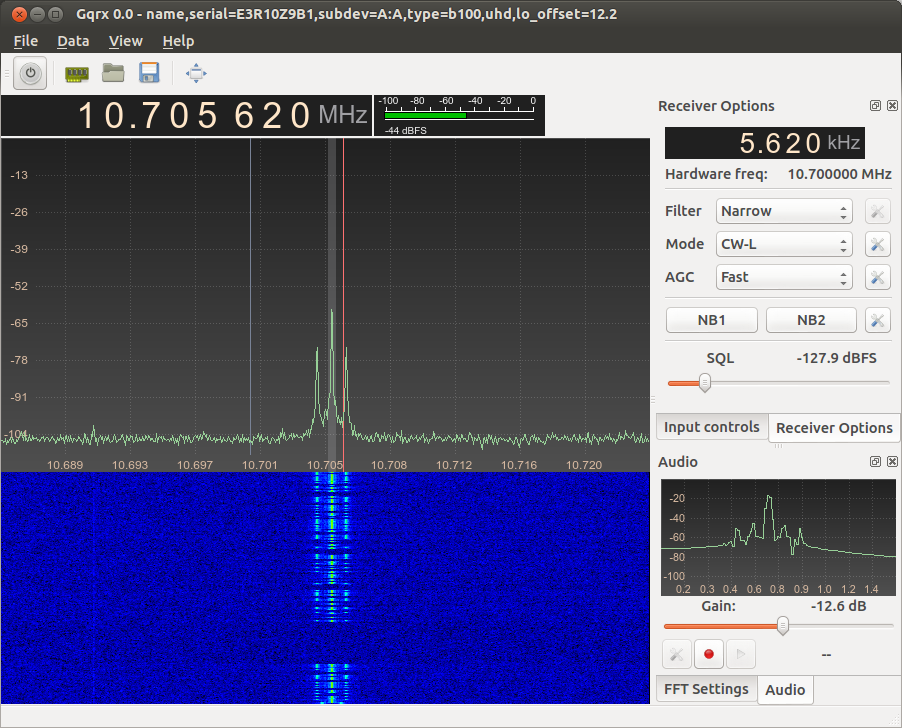
The first button in the top menu is your on/off button. Click it and you should see the graph move and some static should be coming from your speakers/headphones.
The first black box underneath is your frequency adjuster dial. You can hover over any of the numbers, scroll (or input directly), and adjust what frequency you’re receiving on. I suggest tuning in a local radio station, as a test. If you hear the voice/music/ads, you’re in.
The right hand-side menu contains all the fine tuning settings. Play about with the mode, go from FM to AM, CW-L, CW-R etc. Note how the graph indicator moves.
What you’re doing by adjusting that, is you’re essentially limiting the band you’re receiving signals on. This is key, because if the source is transmitting in AM and you’re tuned in CW-L, you won’t be able to hear a thing.
Conclusion
This is it for now. SDR is an amazing thing. I’ll be introducing you to more complex guides and fun projects in the future. For now I suggest, play about with the settings, the frequencies, checkout local police/EMS frequencies and try to tune them in. The best fun can be had by listening to the radar/tower/ground transmissions if you have an airport nearby. Frequency sources can be found on Google, quite easily.
Happy SDR-ing!